Content Script UI
基础描述
同 Content Script 处于同等重要的地位,你可以选择,在各个页面中,注入包含 UI 的部分。
Plasmo 对这部分做了封装,你可以很轻易完成需求。
在Plasmo中 首先支持在 Web 网页中嵌入 React 、Svelte3、Vue3 组件。 这类功能叫做 Content Script UI, 以下简称 CSUI。
一个浏览器扩展可以包含多个 CSUI 组件, 通过 导出 Config 对象,可以控制组件的行为。
注入一个 React组件
- 创建一个
content.tsx - 导出一个默认的
React组件。 - 完成 🎉
const CustomButton = () => {
  return <button>Custom button</button>;
};

export default CustomButton;
当需要多个组件时,你需要创建 contents 目录,在该目录下创建组件文件。
完整实例 : with-content-scripts-ui
配置项
因为, CSUI 也是 Content Script 的子集,所以,共享一个内容配置。
他是怎么工作的呢?
Plasmo 创建了一个 Shadow DOM。
在其中挂载了你导出的 UI 组件。这种机制有效保证了你的组件样式的独立性,即不受页面样式影响。
生命周期
Plasmo 的 CSUI 负责协调一个专门用于在内容脚本中挂载和卸载你的 React、Vue 或 Svelte 组件的生命周期。
尽管每个 UI 库/框架的挂载 API 略有不同,但顶级生命周期大体相同:
相关概念
| 名词 | 相关描述 |
|---|---|
| Anchor | 告诉 CSUI 挂载你的组件的位置和方法。 |
| Anchor-getter | 告诉 CSUI 怎么找到你的 Anchor。 |
| Overlay | Overlay 模式挂载你的组件,挂载在当前页面的 最上层。 |
| Inline | 挂载你的组件在页面的 Dom 里,紧挨着你的 目标 Dom。 |
| Root Container | 一个 由 Plasmo 创建的 ShadowDOM 用来包装你的组件。 |
| Renderer | 最上层的渲染结构,包含了以上的所有方法。 |
Anchor
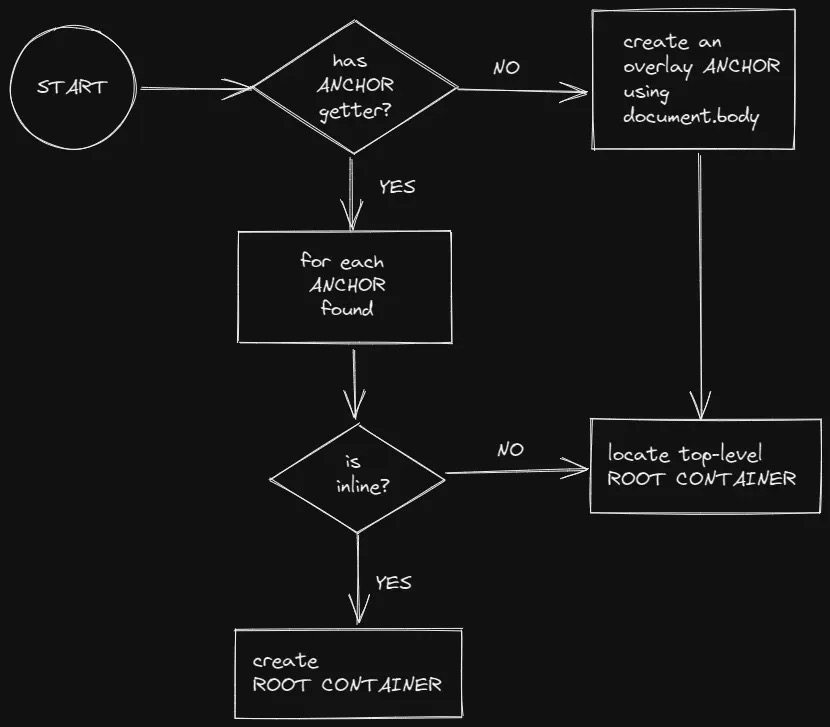
以上流程图描述了在网页中处理(ANCHOR)元素的一系列步骤。
流程开始于“START”,然后遵循以下步骤:
-
检查是否存在 ANCHOR 获取器(has ANCHOR getter?):
- 如果没有(NO),则在
document.body中创建一个覆盖层锚点(overlay ANCHOR)。 - 如果有(YES),则继续下一个步骤。
- 如果没有(NO),则在
-
遍历找到的每一个锚点(for each ANCHOR found): 这一步是对页面中所有锚点进行循环。
-
检查锚点是否为内联(is inline?):
- 如果锚点是内联的(YES),那么创建一个根容器(ROOT CONTAINER)。
- 如果锚点不是内联的(NO),那么定位到顶层的根容器(locate top-level ROOT CONTAINER)。
定义一个 Anchor
export type PlasmoCSUIAnchor = {
  type: "overlay" | "inline";
  element: Element;
};
默认的 Plasmo 提供一个默认的 Anchor 他在 document.body 作为 Element , 以 Overlay 模式呈现。
{
  type: "overlay",
  element: document.body
}
如果 CSUI 文件中定义了 getter 函数 ,那么 CSUI 将会使用该函数返回的元素作为 Anchor。
因为 ,函数定义可以使用 async 异步,所以,你也就可以掌控你的 Anchor 的位置。
比如,你可以一直等待页面上出现某个元素,然后,再返回定义的 元素。
函数定义为 : getOverlayAnchor 和 getInlineAnchor。
当你导出的 UI 元素需要和 Anchor 交互的时候,你可以传递 PlasmoCSUIProps属性。
import type { PlasmoCSUIProps } from "plasmo";

const AnchorTypePrinter: FC<PlasmoCSUIProps> = ({ anchor }) => {
  return <span>{anchor.type}</span>;
};

export default AnchorTypePrinter;
Overlay
Overlay 的嵌入模式,是以当前页面最大的 z-index 渲染导出的 Dom 结构的。
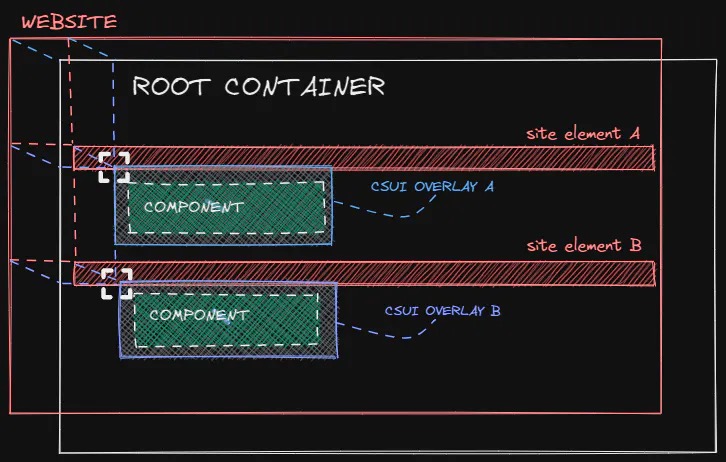
一个 CSUI 文件可以导出多个 Overlay Anchor,每一个 Anchor 都会派生出一个容器, 以渲染新的 Dom 。
一个 CSUI 内的所有容器,从属于同一个根容器。
单一的 Overlay Anchor
import type { PlasmoGetOverlayAnchor } from "plasmo";

export const getOverlayAnchor: PlasmoGetOverlayAnchor = async () =>
  document.querySelector("#pricing");
返回 多个 Anchor
import type { PlasmoGetOverlayAnchorList } from "plasmo";

export const getOverlayAnchorList: PlasmoGetOverlayAnchorList = async () =>
  document.querySelectorAll("a");
getOverlayAnchorList 暂时还不支持动态获取,比如,CSUI 渲染完后新加入的 dom ,无法完成后期的渲染。
watch 更新位置
默认 Overlay Anchor 监听了 window 的滚动事件,保证 自己和 Anchor 定位的元素对齐。 由于某些其他原因,位置变动的时候,无法跟随。Plasmo 给大家提供了 PlasmoWatchOverlayAnchor , 可以轮询变更定位器的位置。
import type { PlasmoWatchOverlayAnchor } from "plasmo";

export const watchOverlayAnchor: PlasmoWatchOverlayAnchor = (
  updatePosition
) => {
  const interval = setInterval(() => {
    updatePosition();
  }, 8472);

  // Clear the interval when unmounted
  return () => {
    clearInterval(interval);
  };
};
具体实例 : with-content-scripts-ui/contents/plasmo-overlay-watch.tsx
Inline

Inline 模式是把 CSUI 的元素嵌入到 web 页面中,紧挨着你定位到的元素。 同上一个 CSUI 文件中定位到 一个或多个 Anchor, 派生出 Inline 模式的 容器,承载你导出的 Dom.
单一的 Inline Anchor
import type { PlasmoGetInlineAnchor } from "plasmo";

export const getInlineAnchor: PlasmoGetInlineAnchor = async () =>
  document.querySelector("#pricing");
返回多个 Inline Anchor
import type { PlasmoGetInlineAnchorList } from "plasmo";

export const getInlineAnchorList: PlasmoGetInlineAnchorList = async () =>
  document.querySelectorAll("a");
官方实例 : with-content-scripts-ui/contents/plasmo-inline
Root Container
Root Container 是你嵌入页面的 UI Dom 最终挂载的地方。
默认情况下,Plasmo 使用了 plasmo-csui 的自定义标签,作为页面的 ShadowDOM 元素。
使用这种机制,你就可以实现自定义样式,同时和页面的主样式隔离开。
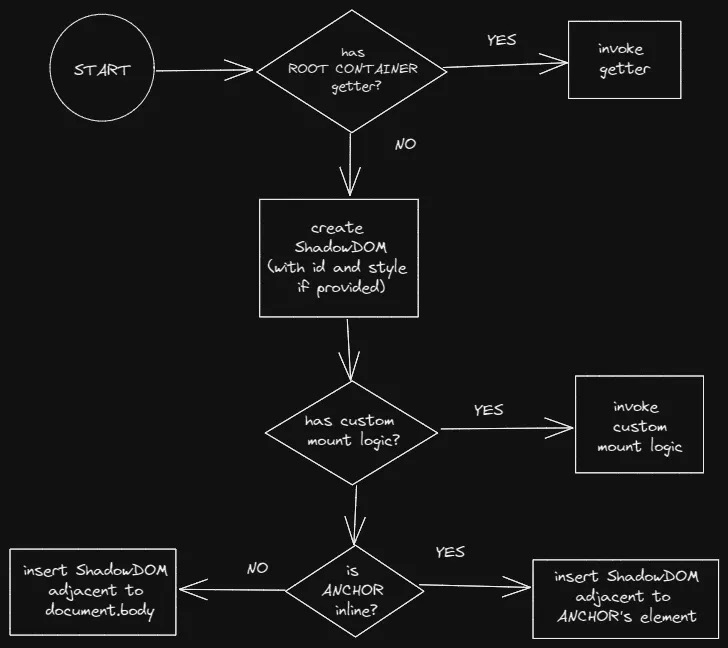
自定义挂载 Dom
Root Container 会创建 shadowHost 来其纳入当前页面的 Dom 树。
默认情况下的注入
- inline anchor :
Plasmo在 指定定位元素的后边创建 shadowHost - Overlay Anchor : 会在 document.body 前边注入。
你可以通过导出一个 mountShadowHost 函数实现自定义挂载。
import type { PlasmoMountShadowHost } from "plasmo";

export const mountShadowHost: PlasmoMountShadowHost = ({
  shadowHost,
  anchor,
  mountState,
}) => {
  anchor.element.appendChild(shadowHost);
  mountState.observer.disconnect(); // OPTIONAL DEMO: stop the observer as needed
};
关闭 Shadow Root
默认情况下 Shadow Root 是 open 的状态,即 允许任何人(扩展开发者、扩展使用者)查看 Shadow Root 的 Dom 树。 有时候,你不希望这种情况发生,你需要导出 PlasmoCreateShadowRoot 函数实现自定义挂载。
import type { PlasmoCreateShadowRoot } from "plasmo";

export const createShadowRoot: PlasmoCreateShadowRoot = (shadowHost) =>
  shadowHost.attachShadow({ mode: "closed" });
经过实验,暂时没有发现什么区别。
自定义样式
Plasmo 内置 给扩展开发者提供了一种安全的修改 CSUI 样式的机制。
通过 getStryle 返回一个 Style Element
更多样式需求,参看 Style 部分。
自定义 Root 容器
有时候,你需要完全替换掉 Plasmo 提供的 Shadow DOM 以满足你自己的需求。
比如 ,你可能想从页面中选择一个元素,作为 Root Container 而不是创建一个。
你可以通过 导出 getRootContainer 实现自定义容器的需求
import type { PlasmoGetRootContainer } from "plasmo";
export const getRootContainer = () => document.getElementById("itero");
这么做的其他几个理由:
- 扩展可能集成宿主页面的样式
- 扩展想把 CSUI 元素挂在到页面上,而不是使用 CSUI 本身。
- 扩展打算使用 iframe 作为内容载体。
当你使用 getRootContainer 导出函数自定义 Root Container 以后。 Plasmo 将会忽略其他的内置的函数, 比如 getStyle getShadowHostId 。如果你需要这些函数,你必须手工调用。
官方提供的实例 : with-content-scripts-ui/contents/plasmo-root-container.tsx
渲染器 (Renderer)
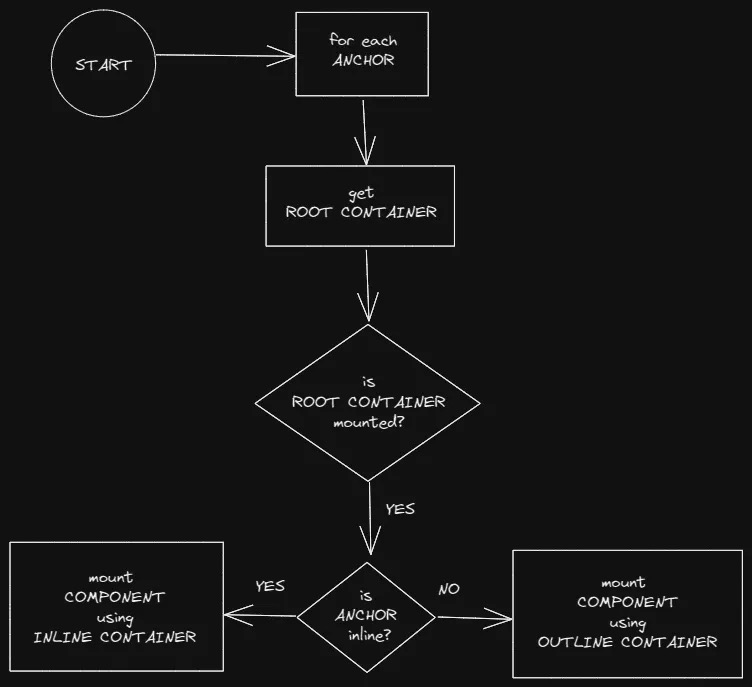
渲染器一直监控网站的 Dom 结构,随时发现 Root Container 的存在。 发现后,就会跟踪 Root Container 和 内部的 Anchor 元素 的链接关系。 当一个稳定的 Root Container 被发现后,渲染器就会把 CSUI 组件中导出的 UI 元素 挂载到 Root Container。 根据 Anchor 定义的不同,Root Container 会被表现为 Inline 或者 Overlay。
检测并优化 Root Container 的删除
当一个网站的 Dom 结构被改变后,一个 Root Container 可能会被删除。
比如你的 CSUI 组件工作在一个 邮件列表的页面上,挂载在每一个邮件元素的 UI 组件上。 当你的邮件被删除的时候,对应的 CSUI 组件也需要被删除。
为了方便检查 UI 组件的删除,CSUI 渲染器会将每一个 挂载了 CSUI 元素的容器和 window.document 做对比。 这个检查可以被优化为 O(1) 的复杂度,你只需要导出一个 getShadowHostId 函数即可。
import type { PlasmoGetShadowHostId } from "plasmo";
export const getShadowHostId: PlasmoGetShadowHostId = () => `adonais`;
这个函数允许开发者根据 anchor 自己定义 ID
import type { PlasmoGetShadowHostId } from "plasmo";

export const getShadowHostId: PlasmoGetShadowHostId = ({ element }) =>
  element.getAttribute("data-custom-id") + `-pollax-iv`;
自定义渲染器
开发者可以导出一个 render函数,覆盖默认的渲染器。你将获得如下的能力
- 提供自定义的
Inline container或者Overlay container - 自定义挂载逻辑
- 提供一个
MutationObserver观察者函数。
比如,你可以这样使用自定义容器
import type { PlasmoRender } from "plasmo";

import { CustomContainer } from "~components/custom-container";

const EngageOverlay = () => <span>ENGAGE</span>;

// This function overrides the default `createRootContainer`
export const getRootContainer = () =>
  new Promise((resolve) => {
    const checkInterval = setInterval(() => {
      const rootContainer = document.getElementById("itero");
      if (rootContainer) {
        clearInterval(checkInterval);
        resolve(rootContainer);
      }
    }, 137);
  });

export const render: PlasmoRender = async ({
  anchor, // the observed anchor, OR document.body.
  createRootContainer, // This creates the default root container
}) => {
  const rootContainer = await createRootContainer();

  const root = createRoot(rootContainer); // Any root
  root.render(
    <CustomContainer>
      <EngageOverlay />
    </CustomContainer>
  );
};
使用内置的 Inline Container 或者 Overlay Container
import type { PlasmoRender } from "plasmo";

const AnchorOverlay = ({ anchor }) => <span>{anchor.innerText}</span>;

export const render: PlasmoRender = async (
  {
    anchor, // the observed anchor, OR document.body.
    createRootContainer, // This creates the default root container
  },
  _,
  OverlayCSUIContainer
) => {
  const rootContainer = await createRootContainer();

  const root = createRoot(rootContainer); // Any root
  root.render(
    // You must pass down an anchor to mount the default container. Here we pass the default one
    <OverlayCSUIContainer anchor={anchor}>
      <AnchorOverlay anchor={anchor} />
    </OverlayCSUIContainer>
  );
};
如果你想自定义观察者函数,那么不要导出 anchor-getter 函数,否则内置的 观察者将会被触发。